Drive through any neighbourhood at dusk and you’ll see the full spectrum of outdoor lighting decisions. The house with a single 300-watt halogen floodlight that illuminates their yard, their neighbour’s yard, and a section of the International Space Station’s flight path. The house with nothing at all — a dark void between streetlights. The house with tasteful path lights, a subtly lit front porch, and accent lighting on the landscaping that makes the whole property look like it’s worth twice what it is. That third house isn’t spending dramatically more money. They just made better choices.
Outdoor lighting serves three purposes: security (deterring intruders and illuminating hazards), function (seeing where you’re walking, cooking on the grill, finding your keys), and ambiance (making your outdoor space look and feel inviting). Good outdoor lighting does all three simultaneously. Bad outdoor lighting does one at the expense of the others — usually by blasting 5,000 lumens of cold white light at everything within 50 feet.
A complete outdoor lighting setup for an average home costs $200-$800 DIY installed, or $2,000-$5,000 professionally installed. The DIY route is entirely feasible for low-voltage landscape lighting and simple fixture swaps. Line-voltage installations (anything connected directly to your home’s 120V electrical system) may require an electrician depending on your comfort level and local codes.
Key Takeaways
- Layer your lighting. Path lights for navigation, accent lights for landscaping, security lights for coverage, and ambient lights for living spaces. No single fixture does it all.
- Low-voltage (12V) landscape lighting is DIY-friendly. A transformer, wire, and fixtures — no electrician needed. This is how most homeowners add landscape lighting.
- Warm white (2700K-3000K) looks dramatically better than cool white (5000K+) for residential outdoor lighting. Cool white is clinical and harsh. Warm white is inviting and flattering.
- Motion-activated security lights are more effective than always-on floods. A light that activates when someone approaches is startling and attention-getting. A light that’s always on is just background noise.
- Dark sky-compliant fixtures direct light downward, not sideways or upward. This reduces light pollution, prevents glare, and keeps your neighbours from hating you.
Types of Outdoor Lighting
Path Lights
Low fixtures (12-18 inches tall) that line walkways, driveways, and garden paths. Their primary purpose is functional — showing where to walk — but they also define the shape of your landscape at night.
Placement: Every 6-8 feet along paths, staggered on alternating sides rather than paired. Staggering looks more natural and provides more even coverage. Place them 6-12 inches off the path edge, angled slightly inward.
Style: Mushroom-top fixtures are the classic design — a dome-shaped cap directs light downward onto the path. Bollard-style fixtures are more modern and architectural. Avoid fixtures that glow upward — they create glare at eye level and waste light on the sky.
Product examples: Hampton Bay Low-Voltage Path Lights ($25-$40 for a 6-pack with transformer), Hinkley Hardy Island ($40-$60 each for premium brass fixtures).
Accent and Landscape Lights
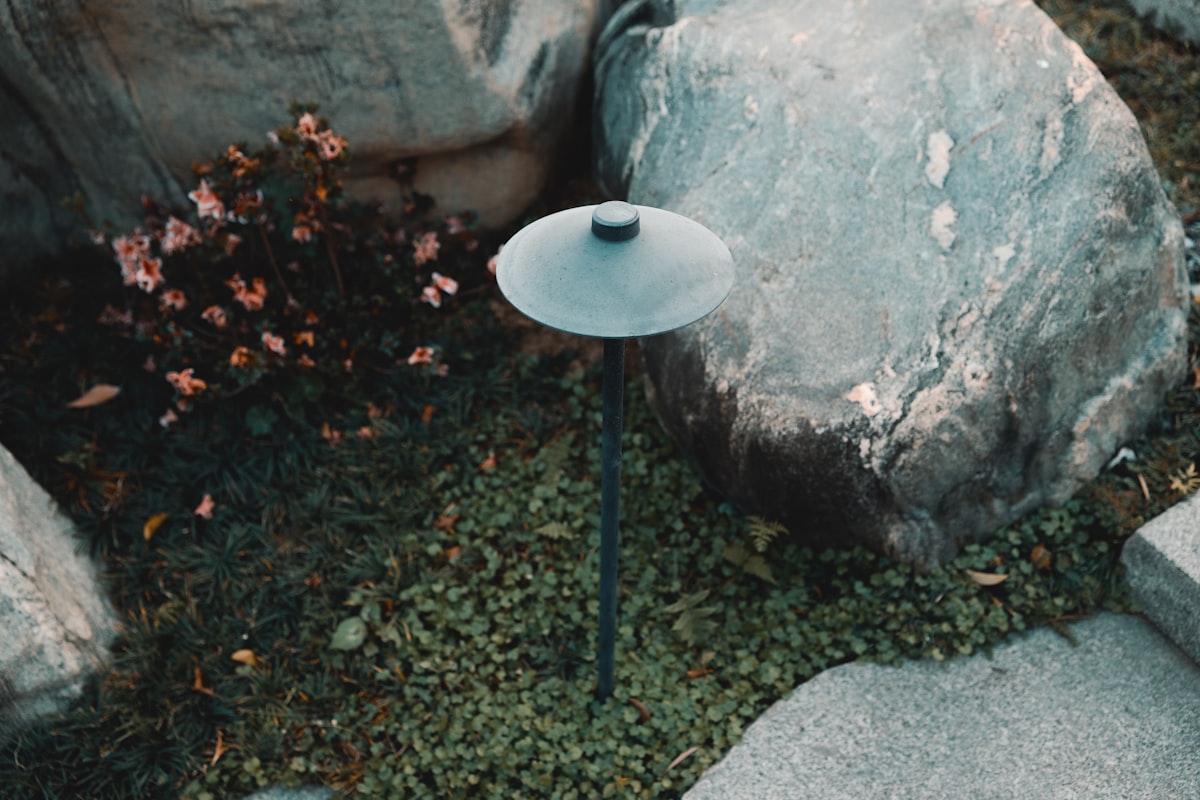
Small fixtures aimed at trees, architectural features, garden beds, or focal points. These are what make a property look expensive after dark.
Uplights: Ground-mounted fixtures that shine upward into trees, onto textured walls, or toward architectural details. The most dramatic effect in landscape lighting — a single well-placed uplight on a mature tree transforms a yard.
Downlights (moonlighting): Fixtures mounted high in trees (15-30 feet) aimed downward, simulating moonlight filtering through branches. Creates gentle, dappled shadows on the ground. Requires climbing or a long ladder to install.
Wash lights: Wide-beam fixtures that graze across a wall, fence, or hedge, highlighting texture. Placed 6-12 inches from the surface at ground level.
Spotlights: Narrow-beam fixtures that highlight a specific element — a fountain, a specimen plant, a sculpture, or a flag. Higher intensity than general landscape lights.
The rule of three: When lighting landscaping, most scenes look best with three elements illuminated — for example, two trees and a textured wall, or a focal plant, a path, and an architectural feature. Lighting everything uniformly eliminates depth and drama. Selective lighting creates visual interest by combining bright areas with shadows.
Security Lights
Motion-activated or dusk-to-dawn fixtures designed to illuminate large areas for safety and deterrence.
Motion-activated floodlights: The most common security light. Dual-head fixtures with PIR (passive infrared) motion sensors. When someone (or something) moves within the detection zone, the lights activate for 1-10 minutes (adjustable) then turn off. This approach is far more effective for security than always-on lights because the sudden activation draws attention and startles intruders. A light that’s always on becomes invisible to neighbours — they stop noticing it.
Products: Ring Floodlight Wired ($50-$70), RAB Lighting STL360H ($80-$120 for commercial-grade), or the budget option — a basic dual-head LED motion light ($25-$40 from most hardware stores).
Dusk-to-dawn fixtures: Fixtures with a photocell that automatically turns on at dusk and off at dawn. Useful for porch lights, garage lights, and entryways where you always want illumination after dark. Many smart bulbs and fixtures now offer dusk-to-dawn mode alongside other features.
Camera floodlights: Ring Floodlight Cam ($200-$250) and similar products combine a security camera with motion-activated lights. If you’re already running a smart home system, these integrate with your existing setup and add both lighting and surveillance.
Ambient and Entertainment Lighting
Lighting for outdoor living spaces — patios, decks, pergolas, outdoor dining areas.
String lights: The ubiquitous outdoor entertaining light. Edison-style bulbs on a weather-rated cord ($15-$40 for a 48-foot strand) draped over a patio, pergola, or between poles create warm, social ambiance. Use LED versions — they run cool, use less energy, and the bulbs last 15,000+ hours.
Step and deck lights: Small recessed or surface-mounted fixtures built into deck steps, stair risers, or railings. Primarily functional (preventing trips) with a secondary ambient effect. Low-voltage LED versions ($5-$15 each) install easily into existing deck framing.
Lanterns and portable lights: Rechargeable LED lanterns, solar table lamps, and candle alternatives that add flexible, moveable lighting to any outdoor space. No installation required.
Low-Voltage Landscape Lighting: The DIY System
Low-voltage (12V) lighting is the standard for residential landscape lighting. The voltage is safe to work with (no risk of dangerous shock), the wire can be buried in shallow trenches without conduit, and the entire system plugs into a standard outdoor outlet via a transformer.
Components
Transformer: Converts 120V household current to 12V. Plugs into a standard GFCI outlet. Available in wattages from 150W to 900W — add up the total wattage of all your planned fixtures and choose a transformer with 20-30% more capacity (headroom for future additions). A 300W transformer ($60-$120) handles most residential systems of 10-20 fixtures.
Popular options: Hampton Bay 200W ($40-$60), Hinkley 300W ($100-$150), and for larger systems, theDERA or Unique Lighting 600W units ($150-$300).
Wire: Direct-burial landscape wire, typically 12-gauge or 14-gauge. 12-gauge is better for longer runs (over 50 feet) because it has lower voltage drop. Sold by the roll — 100 feet of 12/2 landscape wire costs $30-$50.
Fixtures: As described above — path lights, spot lights, well lights, wash lights. Buy fixtures with LED bulbs or integrated LEDs. Halogen landscape lighting is obsolete — LED provides the same light at 80% less energy and without the heat that halogen generates (a fire risk near mulch and dry plants).
Connectors: Waterproof wire connectors that tap into the main wire run without cutting it. Most landscape lighting systems use “pierce-point” connectors that puncture the insulation and make contact with the conductor. Gel-filled waterproof connectors ($1-$2 each) prevent corrosion.
Installation Steps
Step 1: Plan the layout. Walk your property at night with a strong flashlight. Shine it on the elements you want to light — trees, the front facade, paths, garden beds. Mark fixture positions with small flags or stakes. Most people overdo it on their first plan. Start with 8-12 fixtures and add more later if needed.
Step 2: Mount the transformer. It should be near a GFCI outdoor outlet, at least 12 inches off the ground (to stay above snow and splash level), and in a ventilated area. Mount it to the house, a post, or a wall with the included screws.
Step 3: Run the wire. Lay the main wire run along the path of your fixtures. You can either run a single “daisy chain” (one wire loop that all fixtures tap into) or a “hub” system (multiple wire runs from the transformer to different zones). The hub system provides more even voltage across all fixtures and is better for larger systems.
Bury the wire 3-6 inches deep in a shallow trench cut with a flat shovel or lawn edger. In garden beds, simply tuck the wire under mulch. Across lawn areas, cut a slit with an edger, push the wire in, and press the slit closed — the grass grows back over it within weeks.
Step 4: Install the fixtures. Each fixture connects to the wire run via a connector. Drive the stake into the ground, connect the fixture leads to the main wire, and aim the fixture. For uplights and spot lights, aiming is critical — adjust the angle until the light hits exactly where you want it.
Step 5: Connect the wire to the transformer. Strip the wire ends and insert them into the terminal clamps on the transformer. Most transformers have multiple voltage taps (12V, 13V, 14V, 15V). Fixtures at the end of a long wire run receive less voltage due to line loss — connecting to a higher tap compensates. Test the system by measuring voltage at the farthest fixture with a multimeter; it should be 10.8-12V for optimal LED performance.
Step 6: Set the timer or photocell. Most transformers include a timer, photocell, or both. A photocell turns the system on at dusk and off at dawn automatically. A timer adds the option to shut off at a specific time (midnight, for example, to save energy overnight).
Voltage Drop and Wire Sizing
The most common technical issue with low-voltage landscape lighting is voltage drop — the loss of voltage over long wire runs due to resistance. Fixtures far from the transformer receive less voltage, resulting in dimmer light.
How to minimize voltage drop:
- Use 12-gauge wire instead of 14-gauge for runs over 50 feet.
- Keep individual wire runs under 100 feet.
- Use a hub layout instead of a single daisy chain.
- Use the higher voltage taps on the transformer for longer runs.
- Use LED fixtures, which are more tolerant of slight voltage variations than halogen.
Smart Outdoor Lighting Controls
Connecting your outdoor lighting to a smart home system adds convenience and functionality.
Smart transformers: Some landscape lighting transformers (Hinkley, FX Luminaire) have Wi-Fi built in, allowing you to control zones, set schedules, and adjust brightness from an app. Retrofit smart plugs ($15-$25) placed between the outlet and a standard transformer add basic smart on/off control.
Smart light bulbs and fixtures: For porch lights and floodlights, smart bulbs (Philips Hue Outdoor, $30-$50) or smart flood fixtures (Ring, $50-$70) provide colour temperature control, dimming, scheduling, and integration with Alexa, Google Home, or Apple HomeKit.
Astronomy-based scheduling: Many smart lighting systems can set on/off times based on actual sunset and sunrise for your location, adjusting automatically as daylight hours change throughout the year. This eliminates the need to reset timers seasonally.
Colour Temperature: The Detail That Changes Everything
Colour temperature, measured in Kelvin (K), is arguably the single most important decision in outdoor lighting, and the one most people get wrong.
2700K (warm white): The colour of traditional incandescent bulbs. Warm, amber-tinted light that’s flattering to skin tones, landscaping, and architecture. This is the standard for residential outdoor lighting and should be your default choice.
3000K (soft white): Slightly crisper than 2700K but still warm. A good compromise if 2700K feels too yellow to you.
4000K (neutral white): Noticeable white, commercial-feeling light. Acceptable for security floods and commercial spaces. Feels cold and institutional in residential landscape lighting.
5000K+ (cool white/daylight): Blue-white light. The colour of cheap security floods that make everything look like a prison yard. Terrible for ambiance, harsh on neighbours, and unnecessary for residential use. There is no residential outdoor application where 5000K+ is the right choice.
The eye test: Walk through a well-lit restaurant patio (2700K-3000K) and then through a gas station lot (5000K+). Notice how the restaurant feels inviting and the gas station feels exposed. That’s colour temperature at work.
Dark Sky Compliance and Being a Good Neighbour
Light pollution is a real environmental and social concern. Poorly aimed outdoor lighting wastes energy, disrupts wildlife (particularly migrating birds and nocturnal insects), and annoys your neighbours.
Dark sky-compliant fixtures are designed to direct all light downward, with no upward or sideways spill. The International Dark-Sky Association (IDA) certifies fixtures that meet their standards. Look for the IDA-approved label, or simply choose fixtures that are “full cutoff” — meaning no light escapes above the horizontal plane of the fixture.
Practical guidelines:
- Aim all fixtures downward, never upward or horizontally at eye level.
- Use the minimum lumens necessary. A 700-lumen path light is overkill — 100-200 lumens is sufficient. A 3,000-lumen flood covers a large area; 5,000 lumens is almost never needed residentially.
- Use motion activation for security lights instead of dusk-to-dawn operation.
- Shield any fixture that’s visible from neighbouring properties.
- Turn off decorative lighting by midnight (or use timers to do it automatically).
Your neighbours will never thank you for good outdoor lighting practices. They will definitely complain about bad ones.
Solar vs. Wired: An Honest Assessment
Solar landscape lights have improved dramatically, but they’re not a replacement for wired low-voltage systems in most situations.
Solar lights work well for: Decorative path markers, accent lighting in areas far from power sources, and supplemental lighting in gardens. Modern solar path lights ($5-$15 each) provide 4-8 hours of useful light on a full charge and last 2-3 years before the rechargeable battery degrades.
Solar lights fall short on: Consistent brightness (output decreases as the battery drains through the evening), reliability in cloudy or shaded locations (no sun = no charge), and longevity (the batteries degrade and the plastic housings yellow within 2-3 years).
Wired low-voltage lights win for: Consistent output, reliable nightly operation, longevity (quality LED fixtures last 15-20+ years), and the ability to create controlled, aimed lighting effects. The initial installation is more work, but the long-term performance is dramatically better.
The verdict: Use solar for supplemental, decorative purposes where running wire isn’t practical. Use wired low-voltage for your primary landscape lighting system. Trying to do a complete property with solar lights leads to disappointing, inconsistent results.
Common Mistakes
Over-lighting. More fixtures and more lumens don’t automatically look better. Subtlety and shadow are as important as light. A landscape with every tree, shrub, and surface lit to the same intensity looks flat and artificial. Choose what to light and what to leave in shadow.
Wrong colour temperature. We covered this, but it bears repeating: warm white (2700K-3000K) for residential, every time. If you’re buying fixtures or bulbs and they don’t specify colour temperature, find ones that do.
Ignoring glare. A bare bulb visible from a path, patio, or window is glare — it’s uncomfortable and it reduces visibility rather than improving it. All outdoor fixtures should have shields, hoods, or positions that hide the light source from direct view. You should see the effect of the light (illuminated surfaces), not the source.
Forgetting about maintenance. Landscape fixtures collect dirt, mulch, and debris. Spider webs over a lens reduce output by 30%. Clean fixtures annually and adjust any that have shifted out of position. Check wire connections if a fixture goes dark — corrosion at the connector is the most common failure point.
Frequently Asked Questions
How many lumens do I need for outdoor lighting?
It depends on the purpose. Path lights: 100-200 lumens each. Landscape accent lights: 150-300 lumens. Flood/security lights: 1,500-3,000 lumens for a driveway or yard, 700-1,500 lumens for a patio or entryway. Porch lights: 400-800 lumens. More is not better — err on the side of less and add more if needed.
Can I install a line-voltage (120V) outdoor light fixture myself?
Replacing an existing fixture (same location, same wiring) is similar to replacing an interior light — turn off the breaker, verify power is off, disconnect old fixture, connect new fixture. Most homeowners can handle this. Installing a new fixture where no wiring exists requires running new cable, which is an electrician’s job in most jurisdictions. Also, any outdoor 120V fixture or outlet must be on a GFCI-protected circuit. If it isn’t, an electrician should upgrade it. For a broader look at when DIY electrical work is safe versus when to call a pro, our ceiling fan installation guide covers the same decision framework.
Do outdoor LED lights attract fewer bugs than traditional lights?
Yes, significantly. Insects are attracted to UV light, which incandescent and halogen bulbs emit in abundance. LED bulbs produce almost no UV. Warm-coloured LEDs (2700K-3000K) attract the fewest insects, while cool white LEDs (5000K+) attract more because their blue spectrum is closer to UV. Another reason to use warm white.
How long do low-voltage landscape lights last?
LED landscape fixtures have a rated lifespan of 30,000-50,000 hours, which at 6 hours per night translates to 14-23 years. The fixtures themselves (housing, stakes, lenses) typically degrade before the LEDs fail — especially plastic fixtures, which yellow and crack from UV exposure after 3-5 years. Metal or brass fixtures last much longer (15-25+ years). The transformer typically lasts 10-15 years. Wire buried in soil lasts 20+ years if the jacket is intact.
Is it worth hiring a landscape lighting designer?
For a standard home with a front walkway, a few trees, and a patio, the DIY approach works well with some planning and experimentation. For large properties, architectural homes, or situations where you want dramatic effects (moonlighting, facade washing, water feature lighting), a landscape lighting designer ($500-$1,500 for a design plan) brings expertise in fixture placement, beam angles, and layering that’s hard to replicate through trial and error. Many lighting designers also handle installation, with total project costs of $3,000-$10,000+ for a comprehensive system.